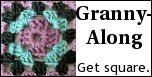
1. kid & grownup xmas stockings, 2. aestlight warmness, 3. festive socks, 4. chunkystripy hat front view, 5. ladybird mittens, 6. colourful pirate hat 2, 7. Newborn slip stitch hat, 8. dragon hunter, 9. jumper moth damage repair, 10. newborn slip stitch hat, 11. annis shawl nupp detail 3, 12. marina detail 3, 13. two hour toddler trousers, 14. tempest button detail, 15. stripy baby socks, 16. fruity sock toe wiggle, 17. handspun hat, 18. mmmm snug, 19. 'Hunter' baby tank top, 20. medusa side view, 21. bobbins, 22. deep v 3, 23. what's this white cold stuff
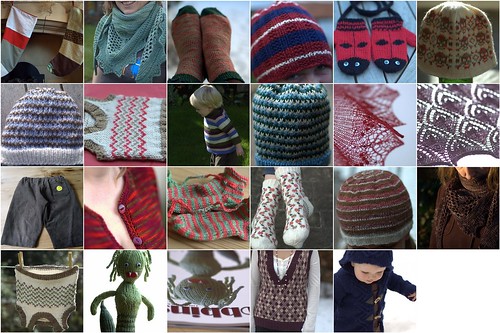
It's RubbishReview of the year time again! This is all the stuff I made in 2010. Well, ok, including some stuff for Bobbins that I made in 2009 but only photographed in 2010. And I cheekily put Bobbins in there too, cos I reckon a magazine sort of counts as handmade. Even if I didn't actually sit there writing out all the words with a pen and manually inserting staples, I did faff around in InDesign dragging text boxes around and moving images one pixel to the right for aaaages.
Difficult to summarize a whole year, but looking at the pictures all together I seem to have a bit of a penchant for stripes, lace and colourwork.
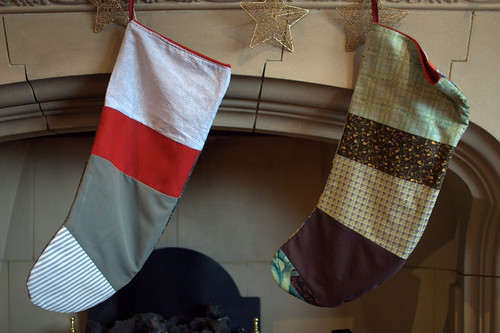
The first picture is something I failed to blog about in the slightly hectic run up to Christmas. I think it was Dec 23rd I found some cheap red fabric in the bargain bin of my local fabric shop and got the crazy idea to sew Christmas stockings for everyone. When I was a nipper, my mum, who was a much better seamstress than I, made stockings for all us kids out of fabric leftovers.
I still have mine with its pleasingly 70s patterns - it's the sort of stocking that makes you want to have a fondue party.
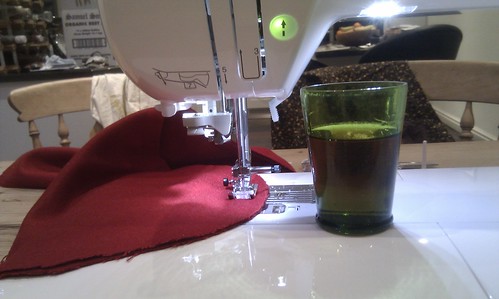
Anyway it struck me when I saw the cheap red fabric that Mr Rubbishknitter and Rubbishknitterjunior were stockingless, and this wouldn't do at all. So I bought it, took it home and started work. I bravely ignored the fact that the heating was broken in our kitchen whilst it was about -10 outside and warmed myself with sloe gin as I sewed. What could possibly go wrong?
Fortunately, it was a fairly easy project and I managed to get two stockings done while Mr Rubbish was out and Rubbishknitterjunior was asleep, so I could surprise them both on Christmas eve.
I just basically drew round mine in chalk to get the shape on two pieces of backing fabric (like this Paddington print - how cute is that? thanks to Kate from GreenEyedMonsters again, from her destash sesh!). Then selected some scraps of fabric which were big enough to piece into another stocking shape, and the colours went ok together. This was the bit that took the most time tbh, it's a difficult decision to make, and I changed my mind several times during sewing. I went for some sober, grown up type fabrics for Mr Rubbishknitter, with a little bit of red to cheer it up a little. And the boy got a sort of brown and green theme, with old shirts and fragments of pretty quilting fabric that was a present from audreym (thanks!).
I love the muted christmassyness of this fabric - 'A Partridge in a Pear Tree' from Abakhans bargain bin.
Once I'd pieced it all together, for each stocking, I sewed the two sides together. Then I made a lining out of the red fabric, which was basically just another identical stocking. I attached the lining by sewing around the top, with wrong sides facing outwards. I left a little gap then turned it inside out, pressing and topstitching around the leg opening. I also put in a little hanging loop cut from a ribbon, cos obviously that's a fairly necessary feature for a christmas stocking. I think the results were pretty good - both stocking recipients seemed pleased with my handiwork, for the whole 5 seconds they admired it before diving in for the presents inside.
Anyway, hope all my blog readers enjoyed the festive season. Happy New Year everyone!
more...
Monday, January 03, 2011
happy new year


Saturday, July 17, 2010
two hour toddler trousers
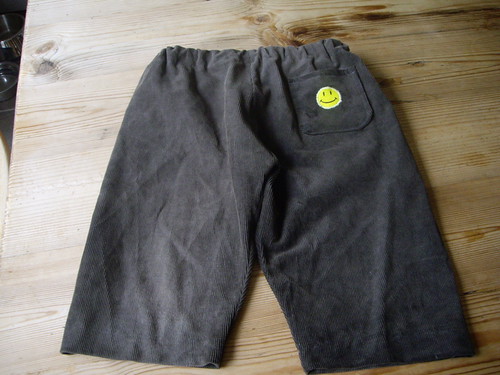
*Drum roll*... it's another poorly executed cheapsk8 sewing project!!1!
So Rubbishknitterjunior was badly in need of another pair of trousers, and Mr Rubbish had recently discarded a well loved old pair of cords. I dived and caught them before they landed in the bin because apart from a couple of threadbare patches, there was a fair bit of usable fabric there. Then last night, there was flash of lightning in the house of Dr. Frankenstitch, and these toddler trousers were created! I didn't use a pattern, as you can probably tell. They're not very neat, and one leg is possibly a bit longer than the other, so they're ideal if your child is a haggis. But they are wearable, potentially durable for the lifespan of a toddlertrouser and look quite comfy. I'll attempt to put together a set of instructions to explain what I did, as much for myself as anything cos I might make more of these - they are so quick, easy and cheap.
Rubbishknitter's recipe for a top quality Friday night in
- You will need: 1 sewing machine, 1 beer, 1 pair of big trousers, 1 piece of wide flat elastic, 1 pair of scissors, some thread and a piece of tailor's chalk.
- Get pair of childtrousers that fit. Lay one small trouser leg within a big trouser leg and draw round it with tailor's chalk, from the crotch to the ankle, across and up to the waistband, into the middle of the waist, then lift up the trousers and draw a freehand curve downwards, joining the line up with where you started. Flip the small trousers over and draw round the other side on the other big trouser leg, so you have an outline of the back piece on one big trouser leg and an outline of the front piece on the other. The back piece should be a bit bigger than the front piece, especially if the kid is still in nappies.
- Draw another line around each shape which adds a seam allowance of about an inch, to allow for ballsups, and a couple of inches at the waist for the waistband. Cut round this outer line, cutting through both sides of the trouser leg, so you end up with 4 pieces: 2 trouser leg backs and 2 trouser leg fronts.
- Optional: Make a pocket by cutting out a pocket shape from cardboard. Draw round it on the fabric, and cut out a piece of fabric with 1/4 inch seam allowance around the curved edge and about an inch at the top. I added a small applique at this point by cutting out a shape from a scrap of fabric and zigzag stitching round it with 0.4mm stitch length. Fold and press all the edges in around the template. Topstitch the straight top edge, then put the pocket where you want it on the trouser leg, fold the seam allowance under and sew round the curved edge as close as you can to the edge without falling off.
- Take a swig of the beer. Sew both back pieces together then sew both front pieces together. Wonder why you have one wide leg and one narrow leg. Smite your forehead and rip out all your seams. (For expediency, you may want to omit this step)
- Lay one back piece on one front piece, right sides together. Sew long straight side seam, then sew inner leg seam from crotch to ankle, so you have a leg tube. Repeat with other back and front piece, so you have two unjoined legs.
- Join the legs by sewing front and back crotch to waist seams.
- Fold waistband over an inch or so all round, then sew it down, leaving enough space at the top to fit a piece of elastic in. Stop just before you've sewn all the way around and thread in the elastic. This is easiest if you put a safety pin in both ends of the elastic, pin one end to the trousers and work the other end through the waistband tube. When the elastic is threaded all the way round, sew across both ends of the elastic. I left the small opening in the waistband unstitched in case I needed to make any adjustments after trying the trousers on, when the child was awake.
- Press up hems at ankle. It might be an idea to measure leg length at this point to get them equal rather than getting impatient and doing it by eye. I used blind hem stitch to do the hems because it seemed like the funnest way.
- Finishing seams is for suckers! Go and finish your beer instead.
- The next day, because of the superspeedy half arsed job you did, you are fresh as a daisy for toddler adventures! Win!


more...
Monday, May 31, 2010
oops, i broke summer

Ok, I can exclusively reveal that the reason the bank holiday scorcher failed to materialise in northern England this weekend isn't anything to do with the Met office messing up their climate prediction models. In fact it has nothing to do with patterns of precipitation and airflow across Europe at all. It's because I sewed myself a sundress! Sorry about that.
The clouds began to gather last week when Mr Rubbishknitter bought a tent on ebay. And now the sewing action, I fear, has sent the sun packing from our skies, and it is unlikely to return until the new dress has fallen apart in the wash. (But don't worry - according to my garment lifespan prediction models, this may happen rather soon.)
I don't know what the fabric is, a lovely friend of mine donated it to the rubbishseamstress cause a while ago. I am a big fan of checky print and was very pleased to discover that the gridlike nature of the pattern makes it relatively easy to sew in a straight line. Although you may detect some wobbling, particularly around the zip area. Zips, in the context of sewing, give me the fear a little bit. I dealt with this using beer, which had a very beneficial effect on my general sense of wellbeing, but not so much on the rectilinear nature of the seams.

I picked a pattern which purported to be Very Easy. It's Butterick 5180, and I would recommend it for other sewing numpties looking for a quick easy dress. There are only 4 pattern pieces, and I managed to join them all together in roughly the right places. It's not amazing, but my expectations were pretty low. There was a minor disaster when I pulled a thread turning it inside out, but this turned out to be fixable using only a knitting needle and some swearing. It's a very basic straight up, straight down shift dress with no shaping so is a bit baggy and not tremendously flattering. The pointy bits at the neck are a little floppy, possibly because the interfacing I used was too lightweight. And if I'd had enough common sense to centre the pattern around the neckline, it would have looked much better. But to be honest I'm just pleased that I managed to complete a wearable garment on a sewing machine without permanently attaching any of my fingers to it. Now, if you will excuse me, i'm off to put a jumper on...
more...
Friday, April 23, 2010
adventures in Walesy-land

Soo, tomorrow I am off to Wonderwool Wales! I rarely go on adventures of such magnitude, and am rather excited, so I felt the occasion demanded a new handmade t-shirt. Except I haven't had a lot of spare time lately, so I downgraded its demands to a new shopmade t-shirt with handmade embellishments. It still took rather a long time though, as I have discovered I am utterly hopeless at sewing cotton jersey. My sewing machine manual suggested a ballpoint needle (yes, I really am that much of a nerd that I read mine). I can see why they suggested this, as sewing it with a normal needle is kind of like walking through a swamp in stilettos. (I should point out I have never actually tried this, I am just guessing, I don't own any footwear of this nature). The ballpoint needle does at least get you from A to B, but mine just left a load of massive holes in the fabric along the way. So any sort of backtracking had catastrophic consequences. My attempts at applique look sort of ok if you squint, but peer too closely and you will see the Swiss cheese like nature of the underlying fabric.
There is a 'back print' too, but I can't show you that because I haven't finished it yet - it will quite possibly be finished by hand in the car on the way down. I'm getting a lift down from a lovely local lady, who knows the roads, so it will be a race against time to get it done on the motorway before we hit the windy lanes of Wales at high speed and I add a special vomit-splatter effect to the fabric. At least I should be fairly recognisable, so please do come up and say hello if you're going too. It's going to be my first night spent away from my small child since his conception, so I will probably get a bit carried away and spend it halfway up Mount Snowdon annihilated on lovely Welsh beer and drooling with a pile of roving for a pillow.
more...
Sunday, October 11, 2009
crafty balls up of the day
Top tip. When attempting to sew a cushion cover, if you have just put in a zip down one side and are feeling quite pleased with yourself. Before putting right sides together and sewing round the other three edges, it might be an idea to open said zip. Otherwise, as any numpty can plainly see, you are going to have extreme difficulty turning the thing inside out. Leaving you with something that is neither decorative nor useful. *Reaches sheepishly for seam ripper*.
I had hoped I could accomplish a simple cushion cover without recourse to an internet tutorial, but clearly I still need google to hold my hand through this area of textile adventuring.
Maybe I should change my name by deed poll to once-rubbish-now-probably-fairly-average-knitter-but-still-mindbogglingly-thick-at-sewing. Catchy! I bet that userid is still available on ravelry too.
more...
Tuesday, August 18, 2009
pimp my ride
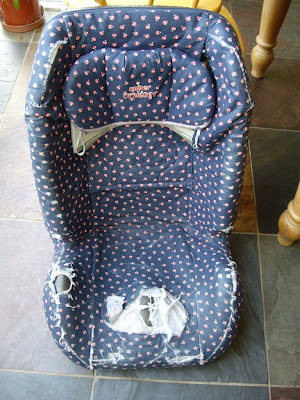
I've been a bit quiet lately, partly because someone borrowed our camera to take on holiday and I'm not an interesting enough writer to make a blog worthwhile without pikshers, and partly because my time has been diverted to essential but fairly unexciting projects such as this. I thought I'd mention it though, because it's one of those crazy half baked ideas that seemed to work against all the odds, and other brassic mothers might appreciate knowing it is feasible.
The car seat in the picture had been not-so-gently used by seven of my nieces and nephews before it made it down the handmedown chain to rubbishknitterjunior. The amount of bouncing around had taken its toll on the upholstery as you see. The day I acquired it, Mr. Rubbishknitter was throwing out a perfectly good shirt with a slightly worn collar. These were the ingredients that combined with one sewing machine, some thread and a lack of general sewing expertise to form the half baked idea. 
I drew the pieces of the original seat cover onto tracing paper to make a sort of pattern, then arranged them onto the shirt, adding seam allowances before I cut the pieces out. I sewed them all together to make a new template - there was just enough shirt to cover the really knackered areas. The really big holes I covered with iron on interfacing, then I sewed the new cover over the worn parts of the old one. This was much easier than making a whole new one as I didn't have to worry about any of the velcro or elastic fastenings. I then attempted to quilt the thing together, although my original draft of a pattern wasn't really accurate enough and there are all sorts of wibbly baggy bits of surplus fabric.
But all in all, I'm quite pleased because it looks like it will now withstand a machine wash, which was my only aim really. And I have saved a Large Amount of coin. Car seats these days seem to cost possibly more than my car is worth. So clearly I was now able to treat myself to something else instead! What could that thing be? You are probably wondering.
MOAR SEWINGZ!11! I've been stalking the clothkits site forever, fondly stroking the rather too expensive kits without buying anything. Then they had a sale in which one of the skirt kits was half price. Win! And the top thing in the picture is a purse and pencil case kit. Yes, I got a little carried away. I've always felt that you could make these things for a fraction of the price by just buying the fabric and notions yourself. And this is almost certainly true, but I need my hand holding a bit with sewing, and i've heard these kits have nice clear instructions, so hopefully this will be a good learning experience. And anyway look at that parcel! Black crepe paper! And some of it is wrapped in a measuring-tape ribbon!11!1 It's been a long time since the postman brought anything that exciting!
more...
Tuesday, July 07, 2009
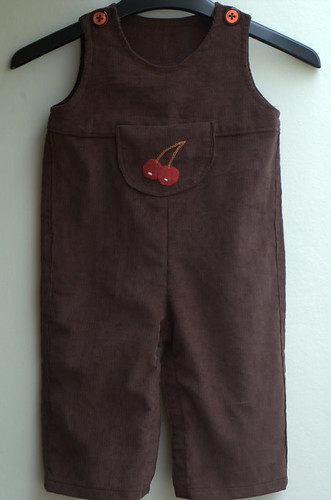
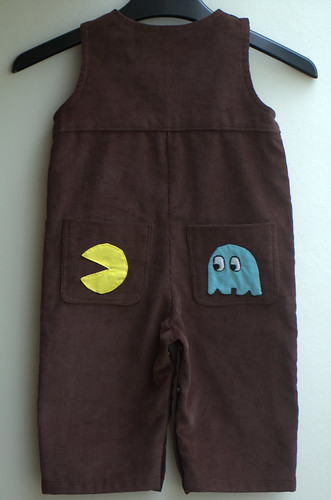
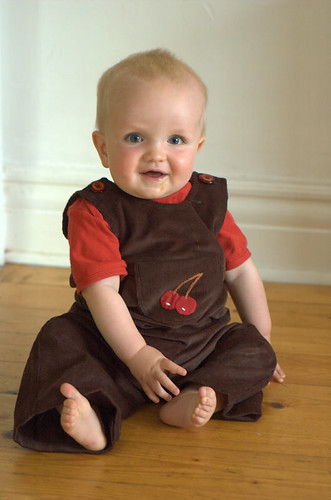
pacman dungarees
So I finished my first evah sewing pattern!!1!1 How exciting. It is Burda 9652, picked because it claimed to be Very Easy. I wouldn't quite go that far, as I don't really have much experience of this sort of thing, but I seem to have got through it ok. There were some sentences I had to read several times, particularly during late night beer assisted sewing sessions, but generally it was pretty straightforward.
Drunk on the excitement of actually finding the pattern comprehensible, and possibly the aforementioned beer, I may have got sliiiightly carried away with the applique there.
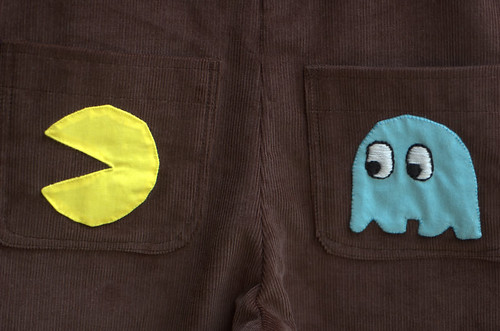
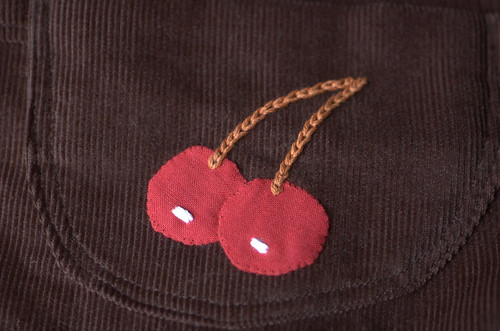
Pacman is being chased by Inky on the back. On the front are some bonus cherries. (I originally fancied an apple or a strawberry, but they would have been trickier, and Mr. Rubbishknitter didn't believe me that you ever got these as bonuses. Obviously because he wasn't as awesome a player as I was). It seemed important at the time for my son to fully appreciate the marvels of the 8 bit era of computer gaming. I started by copying the original pacman sprites onto graph paper. Being incredibly anal I like representations of classic video games to be pixel perfect, and I even toyed with the idea of cutting the characters out with blocky edges, but I doubt I would have been able to get it neat enough, so I rounded out the edges of each original sprite for a slightly cuddlier effect. There are much more suitable ways of representing pixels accurately in the world of textiles - cross stitch, crochet, knitting - so I thought it might work better just to do something simpler.
I made the appliques using bits of scrap fabric. Using a double thickness of each, I drew round my graph paper templates and machine stitched them together nearly all the way round. I trimmed the edges, turned them inside out and hand-slipstitched them onto the pocket pieces. I know this is probably a weird way to do applique. But the scraps of fabric were cheap and flimsy, and after some earlier flirtations I'm now getting a bit bored of zigzag stitch. My previous rubbish attempts at applique have been a bit fally-aparty after a couple of washes. Crapplique, if you will. As this garment is for a child who likes to drag himself around the floor all day, pausing occasionally to dribble chewed up biscuit or throw up on himself, it was imperative that they withstand a few machine washes. So for the teeny tiny details, like Inky's eyes and the cherry stalks, I hand embroidered them on. Yes, it took a while, but it was damn good fun, and each pocket made a pleasingly portable project for sitting in the sun with.
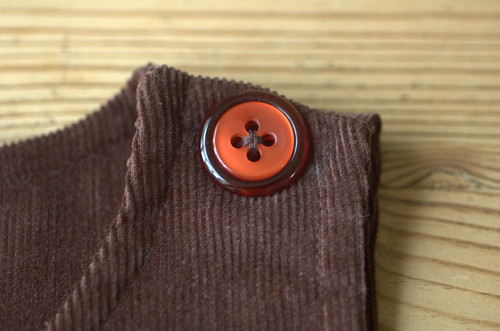
I put buttons at the top instead of poppers because I thought they might hold up to a bit more bouncing around. The other major modification I did was to put poppers along the inside leg seams for ease of nappy changing. I bought a pair of baby dungarees recently from a high street shop, marvelling at the cheapness, then was horrified to realise i had to wrestle the child all the way out of and back into them every time he relieved himself. So this time, poppers it had to be. In the past, I have always used those ones that you have to hand sew on, and the way I attach them they generally fall off quite regularly, causing the air around me to turn blue. This time, this time I would conquer the art of the reclosable seam. I was highly enthused by the idea of popper tape, but could only find it available in white, which would have looked a bit weird on such dark fabric. Dying it could have been an answer but I spotted some dark brown bias binding in the exact right shade in my local fabric shop so opted for making my own using this and a pack of hammerable innable poppers. This turned out to be quite a learning experience. I learnt the following things, which may be useful to others:
So after several popperfails, I am pleased to report the end result is sturdy and easily openable. Phew!
To verify the general sturdiness, here's a few action shots of the dungarees, as modelled by rubbishknitterjunior. I think he likes them.
more...


Friday, June 26, 2009
in soviet russia, fabric sews you

I've been a bit slack with knitting since UK Ravelry Day, for many reasons. Partly heat-induced torpor, which makes a good face-down sprawl on the lawn look incredibly appealing. *Picks ants out of eyebrows*. I've also been down the allotment a lot when I can muster up the energy. (Anyone in the Manchester area want any raspberries?! you have to pick them yourself though :) )
The rest of my spare time, I have mostly been very slowly working on this. My First Evah Sewing Pattern! I finally plucked up the courage to go to my local fabric store, flick through the pattern booklets and pick something. It purports to be Very Easy, so we'll see. It's a sort of dungarees / romper suit type thing for a baby. I'm not used to this topsy turvy world of sewing, where the pattern costs 3 quid and the fabric is only 2.50. So the small bit of tissue papery stuff is more expensive than the big bit of corduroy? I come from Knitting Land where most patterns are free and the raw materials are sometimes pricey, so this fabric shop is a bit like looking glass world to me - I half expected the Red Queen to take my money. So far I haven't found anything too unintelligible in the pattern, but I haven't got very far as it took me ages to cut everything out. As the pattern has lots of different sizes, I felt that it might be nice to reuse it when the wee man has grown a bit, so I decided to be a masochist and not actually cut the pattern pieces. Instead I laboriously traced the pattern, cut out templates, and eventually just gave up and drew roughly on the fabric with chalk where the lines were supposed to be. I can't see this being a particularly accurate garment but it's a learning experience I guess. Hey, I have already learned that for the sake of saving three quid, it would have been an awful lot easier just to cut the damn thing! Oh well. At least I can progress on to the hopefully slightly more fun bit where I actually sew stuff together now... although, the sun has come out now, and there is a comfy looking patch of grass over there...
more...
Thursday, June 11, 2009
trousered
So on UK Ravelry Day I had a bit of a knitting binge on my Charade socks. This was partly due to the excitement of having a whole day out of the house, and partly due to the highly compelling sock yarn I am using. I've never used handpainted yarn before but I can see why people get into it... it's like reading a book, you never quite know what's going to happen next, and you can't wait to see. Anyway it was such a pageturner of a sock I knitted the first one in two days. Then I was slightly worried that my socky overindulgence might make my arms fall off if I continued at that pace, so thought I'd maybe better try something less knitty for a while.
The baby has an irritating habit of growing out of his clothes, so I thought I'd make him some more out of some leftover bits of fabric. Sensible trousers are the order of the day here. I think it's the post-teddy bear suit backlash, I seem to be having a phase of dressing him like an old man. First attempt was the Baby Bloomers out of Sew Hip magazine. Well sort of - I cut out the pattern pieces and was unable to get them to fit together, so in the end I simplified it by just joining 4 pieces of fabric cut from the back pattern piece, instead of having a different back and front. This made them stupidly baggy. I'm not too sure about the result tbh. He wore them yesterday but they have a slightly Tudor look which is a little further along the old man scale than I had anticipated. The elasticated ankles ride up in use so they're round his thighs. Not all that useful as he's started crawling and I would have liked something to protect his knees from getting battered around too much. I may take the elastic out and see if that helps.

They were a super quick easy project anyway, so I thought i'd have a go at making another pair. Enter the Pockety trousers. These are pretty similar in construction, except I redrew the pattern pieces again to get a bit of a better fit. Longer legs and a slightly less comedy arse. I also left out the ankle elastic for less of a Henry VIII look. I like the way in this staid grey fabric (megacheap scrap fabric from a bargain bin, don't ask what it was) they look like the baby equivalent of an old man trouser that you might get in the back of a sunday supplement. But really, it's all about the pocket with these. I've always been amused by the concept of pockets on baby clothes, and while this one is clearly pretty useless it does sort of serve a function. I have a recurring issue with some handmade clothes that I can never tell the back from the front. In the rush to get dressed in the morning, I can often be found swearing and examining jumpers to try and find waist shaping / a couple of extra stitches at the neckline. This isn't what you want, particularly when trying to wrestle clothes onto a baby who is trying to hurl himself off the top of the dresser and is systematically removing each article of clothing you put on. So at least with these you can tell which way round they are at a glance.
And I had so much fun doing the pocket. I got the idea out of the Readers Digest Guide to Sewing which has a nice detailed how to for patch pockets. I put in an inverted pleat and machine sewed a buttonhole. Totally awesome. I want to put pockets and buttons on everything now. Or perhaps I should make a teeny tiny baby wallet and mobile phone to put in the pocket. (Or perhaps I should get out more.)
more...
Tuesday, March 24, 2009
crinkly elephant teething square

So rubbishknitterjunior is teething, and has one of those little comforter type things, that is basically two pieces of fabric with some crinkly sounding material in the middle. He likes the noise it makes and will sit contentedly chewing various parts of it. It's pretty useful for keeping him entertained in the pram, but obviously gets quite dribble-saturated and needs washing rather a lot. I thought about getting another one, but then I thought, but it's just a couple of squares of fabric, surely that's about as easy to make as it gets! All I need is to figure out where to get hold of some crinkly stuff to put in the middle. But what? And suddenly, in a moment of extreme cheapskateness ecofriendliness it occurred to me... that a plastic bag might do the trick! Would it be alright in the sewing machine though, and would it go through the wash? Well I thought I'd give it a go and see.
This is what I did (I thought I'd do a proper tutorial type thing, as some people found my sitting-up cushion idea useful, and I didn't really explain that very well. Also it's really easy to make and would make a nice quick handmade present for a friend. It would probably only take an hour or so if, unlike me, you were a proficient sewer and didn't get sucked into reading about the differences between African and Indian elephants on wikipedia)How to make a crinkly elephant teething square / comforter / miniblanket / thing
 Cut out two squares of scrap fabric, the same size. My plastic bag was sort of transparent so I was able to lie it on top of a fabric square, draw round it with a biro and cut it out that way.
 Draw a picture of an elephant. No laughing at mine.
 Cut the elephant shape out of a suitably implausible fabric.
 Cut out some ears. I chose to add a layer of plastic bag here too so that the ear is crinklable.
 Using a tiny bit of black embroidery thread or scrap yarn, embroider a french knot onto the elephant's face for its eye. Cut out a tusk from white felt. (White cottony fabric might be stronger if you have any). I sewed on the tusk at one end like I was sewing on a button. It may or may not fall off over time.
 Pin or glue the elephant to the right side of one of your fabric squares, then sew round the outside with a wide, short zigzag stitch (mine was 4mm wide, 0.4mm long).
 Layer the ears with right sides of the fabric pieces together, and the plastic bag piece underneath both of these. Sew around the ears leaving about 1/4 inch round the edge, but don't sew the bit where the ear is going to join to the body.
 Turn ear inside out. Fold in the raw edges and sew the ear onto the appropriate part of the rest of the elephant with a straight stitch. (Don't be tempted to reach for the iron when folding in the edges, if you have sewn a bit of plastic bag inside the ear. I imagine this would have disastrous consequences. Squashing it down with your fingers is fine)
 When you're happy with the picture, layer up the 3 squares in this order: plastic bag (bottom), fabric square 1 with RS up, fabric square 2 with RS down (top). Pin together. I don't reckon it matters if you make holes in the plastic bag while pinning, nobody will see and it's not going to fray or anything. About 1/4 inch in from the edge, sew through all 3 layers until you are a couple of inches from where you started. Stop and turn the comforter inside out so the nice applique is showing. Topstitch round the edge of the right-side-out square, folding in and sewing over the bit where you turned it inside out, so it is all properly sealed. Finished!
And it went down pretty well with the wee fella, keeping him amused for a full couple of picoseconds. It has been through the wash fine at 30 degrees, several times.
Disclaimer: don't let the baby pull off ears/tusks and eat them. If your baby manages to maim itself in some way on a square of fabric, please don't blame me.
more...
Thursday, March 12, 2009
crafty balls-up of the day

The supremely well sewn on popper fell off and needed reattaching. So, er... can you see what I did there?
Ta-da! It's a moebius bib!1!1
Truly, I am a tool of the highest order. I can't even be bothered to fix it right now - its only raison d'etre is to be puked on, it doesn't deserve this amount of my attention... I think my need for caffeinated beverages is more pressing!
more...
Friday, March 06, 2009
sewathon 2k9

So I've been on a bit of a sewing bender, drunk on the moderate success of the quilt, which hasn't fallen apart yet. Still floundering around at the bottom of Maslow's hierarchy, my first need was Somewhere to Put the Baby Down without him falling over and cracking his head on the kitchen tiles. He's sort of sitting up now, but falls over in all directions at once quite a lot. I tried precariously balancing small piles of cushions around him, but they seemed to slide out of the way all the time, and were a bit of a pain to carry round if you needed to leave the room and answer the door or whatever. So I thought a big cushion was the answer. In my mind's eye I had a doughnut-shaped cushion so you could sit him in the middle and the soft outer padding would catch his head when he falls. I went to my local parenting type store and was horrified to find that you can't actually buy the thing I had in my mind. You could buy a similar sort of thing, but it had flashing lights and played tunes and cost about 70 quid. All I wanted was a big cushion dammit! Preferably not bedecked with anthropomorphic animals that were smiling far too much. In fact I needed to get out of the shop quickly as it was full of screaming kids being dropkicked around and my blood pressure was rising to dangerous levels. Was I going to have to make the thing myself?
Yes, yes I clearly was, because the idiots in the shop had completely failed to make a product that exactly matched my mental image. So back home I went.
In a separate incident, earlier that day I had been trying to get rid of some manky old bedding in a non-landfilly way, and had put it out for the charity collection. I'd put it in the porch out of the rain, they hadn't noticed and had driven past. I had even run out of the house and chased them halfway down the road with it, but it was a bit of a charitable fail. (Not that it probably was something they would have been pleased to receive - yay, manky bedding! But I felt better doing this than cramming it into a wheelie bin). Slowly the seed of an idea began to germinate in the arid desert of my brain. A couple of hours later, I stood, scissors drawn, thread hanging out of my hair, triumphant over my big doughnut cushion. Sewing rocks. I had calculated the necessary radius of the cushion as slightly more than the head-to-arse distance on the baby. (Possibly there is a better name for this measurement in tailorland, but I am not aware of it). Then I cut 4 c-shaped pieces out of a double sheet, sewed them together to make a big round tube. Turning this right side out, I ripped open two of the old, mingingly stained pillows and pulled out the stuffing. I used polyester pillows - feather and down ones would, I imagine, have made something of a mess, and maybe got the dog overexcited with dreams of avian carnage. Inside the pillows the stuffing was just one folded sheet of wadding, so I pulled handfuls off it and crammed it into the tube so that my cushion was stuffed sort of evenly. Well, maybe a tad lumpily. Once stuffed, I sewed up the seam to join the tube into a doughnut shape, handsewing the last bit.
Then I made a removable, washable cover, as the child who sits on this cushion is a bit like Monsieur Creosote. I had to spend some money on this part which was a shame. But 15 quid got me a single duvet cover, which was exactly the right width, and I could cut the poppers off the end and sew them around the edge, so it's really easy to take on and off. Which is lucky, as it has already been washed about 999 times. I have to say it's been a really useful thing, only cost 15 quid and a spool of thread and it only took about 3 or 4 naptimes to make. And the dog is already eyeing it up as his next bed once the baby has tired of it. So there you go, feel free to borrow Rubbishseamstress's thrifty idea! (Disclaimer: no responsibility taken if your child manages to fall over on it and brain itself)
The baby seems to find it hilarious when he falls over (and doesn't brain himself).
In other sewing adventures, I made a hooded baby towel from a tutorial on the purl bee, as the wee man seems to have outgrown a lot of his tiny wee newborn towels. This was a nice easy project I thought, it didn't seem too difficult to sew the towelling. The binding was just some polycotton I got from my local fabric store, along with the towelling. And I am using the leftovers to make bibs. Yes, it is getting a bit embarrassing now, the poor child is constantly modelling things his mother made. Someone asked me the other day if I had made his pram too. I'm not even sure they were completely joking.


more...