![]()
Wowsers. My crafty dabblings have been recently put to shame by this gobsmackingly gorgeous cross-stitch wallhanging that my friend Amy has just presented me with. It's all done using teeny-tiny thread for incredibly detailed pictures. Thought you crafty blog readers might enjoy its handmade marvellousness!
It's a present for rubbishknitterjunior for his room, I am going to get it framed. I expect him to be fully literate by about one year old after gazing slack jawed at the loveliness of this thing. I can't decide which is my favourite letter - they are all so amazingly intricately detailed, I don't see how Amy has managed to do this and maintain a job and active social life this winter.


It's just totally awesome to receive any kind of handmade gift, but to receive one that clearly has had so much time lavished on it really does make me feel very honoured and quite emotional. And very inspired, and somewhat vindicated for spending so much time making things, when such heights of beautiful thing-making can be aspired to.
The only problem I have now is - what am I going to make for her in return? The crafty bar has been raised to a sillily high level by this gift, and she is off on a round-the-world trip in a month's time... yikes!
more...
Monday, March 30, 2009
alphabet wall hanging
Tuesday, March 24, 2009
crinkly elephant teething square

So rubbishknitterjunior is teething, and has one of those little comforter type things, that is basically two pieces of fabric with some crinkly sounding material in the middle. He likes the noise it makes and will sit contentedly chewing various parts of it. It's pretty useful for keeping him entertained in the pram, but obviously gets quite dribble-saturated and needs washing rather a lot. I thought about getting another one, but then I thought, but it's just a couple of squares of fabric, surely that's about as easy to make as it gets! All I need is to figure out where to get hold of some crinkly stuff to put in the middle. But what? And suddenly, in a moment of extreme cheapskateness ecofriendliness it occurred to me... that a plastic bag might do the trick! Would it be alright in the sewing machine though, and would it go through the wash? Well I thought I'd give it a go and see.
This is what I did (I thought I'd do a proper tutorial type thing, as some people found my sitting-up cushion idea useful, and I didn't really explain that very well. Also it's really easy to make and would make a nice quick handmade present for a friend. It would probably only take an hour or so if, unlike me, you were a proficient sewer and didn't get sucked into reading about the differences between African and Indian elephants on wikipedia)How to make a crinkly elephant teething square / comforter / miniblanket / thing
 Cut out two squares of scrap fabric, the same size. My plastic bag was sort of transparent so I was able to lie it on top of a fabric square, draw round it with a biro and cut it out that way.
 Draw a picture of an elephant. No laughing at mine.
 Cut the elephant shape out of a suitably implausible fabric.
 Cut out some ears. I chose to add a layer of plastic bag here too so that the ear is crinklable.
 Using a tiny bit of black embroidery thread or scrap yarn, embroider a french knot onto the elephant's face for its eye. Cut out a tusk from white felt. (White cottony fabric might be stronger if you have any). I sewed on the tusk at one end like I was sewing on a button. It may or may not fall off over time.
 Pin or glue the elephant to the right side of one of your fabric squares, then sew round the outside with a wide, short zigzag stitch (mine was 4mm wide, 0.4mm long).
 Layer the ears with right sides of the fabric pieces together, and the plastic bag piece underneath both of these. Sew around the ears leaving about 1/4 inch round the edge, but don't sew the bit where the ear is going to join to the body.
 Turn ear inside out. Fold in the raw edges and sew the ear onto the appropriate part of the rest of the elephant with a straight stitch. (Don't be tempted to reach for the iron when folding in the edges, if you have sewn a bit of plastic bag inside the ear. I imagine this would have disastrous consequences. Squashing it down with your fingers is fine)
 When you're happy with the picture, layer up the 3 squares in this order: plastic bag (bottom), fabric square 1 with RS up, fabric square 2 with RS down (top). Pin together. I don't reckon it matters if you make holes in the plastic bag while pinning, nobody will see and it's not going to fray or anything. About 1/4 inch in from the edge, sew through all 3 layers until you are a couple of inches from where you started. Stop and turn the comforter inside out so the nice applique is showing. Topstitch round the edge of the right-side-out square, folding in and sewing over the bit where you turned it inside out, so it is all properly sealed. Finished!
And it went down pretty well with the wee fella, keeping him amused for a full couple of picoseconds. It has been through the wash fine at 30 degrees, several times.
Disclaimer: don't let the baby pull off ears/tusks and eat them. If your baby manages to maim itself in some way on a square of fabric, please don't blame me.
more...
Thursday, March 12, 2009
crafty balls-up of the day

The supremely well sewn on popper fell off and needed reattaching. So, er... can you see what I did there?
Ta-da! It's a moebius bib!1!1
Truly, I am a tool of the highest order. I can't even be bothered to fix it right now - its only raison d'etre is to be puked on, it doesn't deserve this amount of my attention... I think my need for caffeinated beverages is more pressing!
more...
Monday, March 09, 2009
grizzly man

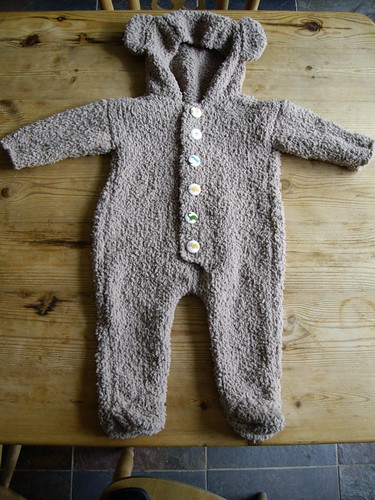
There's almost nothing you can add to a picture as ridiculous as this. The pattern is Teddy Bear All-in-one with Mittens by Sirdar - one of those old fashioned leaflets they used to have before the internets. My sister bought it and sent it to me a couple of months ago. I feel such philanthropic behaviour needs to be encouraged, so I immediately cast on.
The yarn is Sirdar Snowflake Chunky, and is the perfect example of yarn that a non-knitter thinks is a good idea. It is like knitting with cheese wire dipped in prittstick then rolled in cotton wool. Now I don't usually complain about yarn discomfort - I am happy to knit with the skinniest toughest 4 ply, but this left a deep groove in my finger that you could have rolled a marble down. The outer fluffy stuff is soft but has a tendency to come off in clumps if you accidentally tug in the wrong place. It also does a superbly efficient job of masking what you're doing, so you can't actually see stitches at all. This is frustrating at first - I was too cross to even attempt to work out my gauge before starting (and consequently have a slightly chubby bear suit) but to be fair it does have its advantages too. The sewing up was really easy (I am not a masochist, so used some smooth cotton in the same colour left over from the blanket of many browns) because, well, it didn't really need to be that neat. There were loads of seams but I got that bit all done in about a day. Possibly a little too quickly if we're honest - I completely forgot about the convention of baby clothes to put poppers on the inside leg for easy nappy changing - but I guess the button down front means it's not really that much more effort. 
Speaking of buttons, these rather awesome ones were a gift from catr a while ago - so I don't know where they came from but they are very lovely and, pleasingly, the perfect size for this project. There are various dinosaurs, birds and a rabbit - I tried to arrange them in approximate evolutionary order but stopped short of googling to determine whether diplodocus preceded stegosaurus on the geological time line. I think from time to time I get a little overabsorbed in projects, and should go outside and get some fresh air. Which young rubbishknitterjunior can enjoy a bit more in his new comedy outfit - for all its failings, this yarn is nice and snug when knitted up, a bit like a fleecy jumper. And brrr, that air is still pretty damn fresh out there! Wrap up warm, knitterfriends....
more...
Friday, March 06, 2009
sewathon 2k9

So I've been on a bit of a sewing bender, drunk on the moderate success of the quilt, which hasn't fallen apart yet. Still floundering around at the bottom of Maslow's hierarchy, my first need was Somewhere to Put the Baby Down without him falling over and cracking his head on the kitchen tiles. He's sort of sitting up now, but falls over in all directions at once quite a lot. I tried precariously balancing small piles of cushions around him, but they seemed to slide out of the way all the time, and were a bit of a pain to carry round if you needed to leave the room and answer the door or whatever. So I thought a big cushion was the answer. In my mind's eye I had a doughnut-shaped cushion so you could sit him in the middle and the soft outer padding would catch his head when he falls. I went to my local parenting type store and was horrified to find that you can't actually buy the thing I had in my mind. You could buy a similar sort of thing, but it had flashing lights and played tunes and cost about 70 quid. All I wanted was a big cushion dammit! Preferably not bedecked with anthropomorphic animals that were smiling far too much. In fact I needed to get out of the shop quickly as it was full of screaming kids being dropkicked around and my blood pressure was rising to dangerous levels. Was I going to have to make the thing myself?
Yes, yes I clearly was, because the idiots in the shop had completely failed to make a product that exactly matched my mental image. So back home I went.
In a separate incident, earlier that day I had been trying to get rid of some manky old bedding in a non-landfilly way, and had put it out for the charity collection. I'd put it in the porch out of the rain, they hadn't noticed and had driven past. I had even run out of the house and chased them halfway down the road with it, but it was a bit of a charitable fail. (Not that it probably was something they would have been pleased to receive - yay, manky bedding! But I felt better doing this than cramming it into a wheelie bin). Slowly the seed of an idea began to germinate in the arid desert of my brain. A couple of hours later, I stood, scissors drawn, thread hanging out of my hair, triumphant over my big doughnut cushion. Sewing rocks. I had calculated the necessary radius of the cushion as slightly more than the head-to-arse distance on the baby. (Possibly there is a better name for this measurement in tailorland, but I am not aware of it). Then I cut 4 c-shaped pieces out of a double sheet, sewed them together to make a big round tube. Turning this right side out, I ripped open two of the old, mingingly stained pillows and pulled out the stuffing. I used polyester pillows - feather and down ones would, I imagine, have made something of a mess, and maybe got the dog overexcited with dreams of avian carnage. Inside the pillows the stuffing was just one folded sheet of wadding, so I pulled handfuls off it and crammed it into the tube so that my cushion was stuffed sort of evenly. Well, maybe a tad lumpily. Once stuffed, I sewed up the seam to join the tube into a doughnut shape, handsewing the last bit.
Then I made a removable, washable cover, as the child who sits on this cushion is a bit like Monsieur Creosote. I had to spend some money on this part which was a shame. But 15 quid got me a single duvet cover, which was exactly the right width, and I could cut the poppers off the end and sew them around the edge, so it's really easy to take on and off. Which is lucky, as it has already been washed about 999 times. I have to say it's been a really useful thing, only cost 15 quid and a spool of thread and it only took about 3 or 4 naptimes to make. And the dog is already eyeing it up as his next bed once the baby has tired of it. So there you go, feel free to borrow Rubbishseamstress's thrifty idea! (Disclaimer: no responsibility taken if your child manages to fall over on it and brain itself)
The baby seems to find it hilarious when he falls over (and doesn't brain himself).
In other sewing adventures, I made a hooded baby towel from a tutorial on the purl bee, as the wee man seems to have outgrown a lot of his tiny wee newborn towels. This was a nice easy project I thought, it didn't seem too difficult to sew the towelling. The binding was just some polycotton I got from my local fabric store, along with the towelling. And I am using the leftovers to make bibs. Yes, it is getting a bit embarrassing now, the poor child is constantly modelling things his mother made. Someone asked me the other day if I had made his pram too. I'm not even sure they were completely joking.


more...