
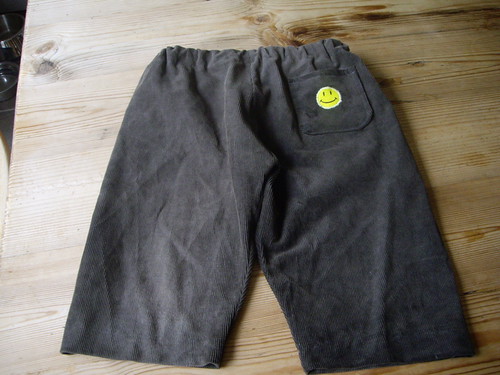
*Drum roll*... it's another poorly executed cheapsk8 sewing project!!1!
So Rubbishknitterjunior was badly in need of another pair of trousers, and Mr Rubbish had recently discarded a well loved old pair of cords. I dived and caught them before they landed in the bin because apart from a couple of threadbare patches, there was a fair bit of usable fabric there. Then last night, there was flash of lightning in the house of Dr. Frankenstitch, and these toddler trousers were created! I didn't use a pattern, as you can probably tell. They're not very neat, and one leg is possibly a bit longer than the other, so they're ideal if your child is a haggis. But they are wearable, potentially durable for the lifespan of a toddlertrouser and look quite comfy. I'll attempt to put together a set of instructions to explain what I did, as much for myself as anything cos I might make more of these - they are so quick, easy and cheap.
Rubbishknitter's recipe for a top quality Friday night in
- You will need: 1 sewing machine, 1 beer, 1 pair of big trousers, 1 piece of wide flat elastic, 1 pair of scissors, some thread and a piece of tailor's chalk.
- Get pair of childtrousers that fit. Lay one small trouser leg within a big trouser leg and draw round it with tailor's chalk, from the crotch to the ankle, across and up to the waistband, into the middle of the waist, then lift up the trousers and draw a freehand curve downwards, joining the line up with where you started. Flip the small trousers over and draw round the other side on the other big trouser leg, so you have an outline of the back piece on one big trouser leg and an outline of the front piece on the other. The back piece should be a bit bigger than the front piece, especially if the kid is still in nappies.
- Draw another line around each shape which adds a seam allowance of about an inch, to allow for ballsups, and a couple of inches at the waist for the waistband. Cut round this outer line, cutting through both sides of the trouser leg, so you end up with 4 pieces: 2 trouser leg backs and 2 trouser leg fronts.
- Optional: Make a pocket by cutting out a pocket shape from cardboard. Draw round it on the fabric, and cut out a piece of fabric with 1/4 inch seam allowance around the curved edge and about an inch at the top. I added a small applique at this point by cutting out a shape from a scrap of fabric and zigzag stitching round it with 0.4mm stitch length. Fold and press all the edges in around the template. Topstitch the straight top edge, then put the pocket where you want it on the trouser leg, fold the seam allowance under and sew round the curved edge as close as you can to the edge without falling off.
- Take a swig of the beer. Sew both back pieces together then sew both front pieces together. Wonder why you have one wide leg and one narrow leg. Smite your forehead and rip out all your seams. (For expediency, you may want to omit this step)
- Lay one back piece on one front piece, right sides together. Sew long straight side seam, then sew inner leg seam from crotch to ankle, so you have a leg tube. Repeat with other back and front piece, so you have two unjoined legs.
- Join the legs by sewing front and back crotch to waist seams.
- Fold waistband over an inch or so all round, then sew it down, leaving enough space at the top to fit a piece of elastic in. Stop just before you've sewn all the way around and thread in the elastic. This is easiest if you put a safety pin in both ends of the elastic, pin one end to the trousers and work the other end through the waistband tube. When the elastic is threaded all the way round, sew across both ends of the elastic. I left the small opening in the waistband unstitched in case I needed to make any adjustments after trying the trousers on, when the child was awake.
- Press up hems at ankle. It might be an idea to measure leg length at this point to get them equal rather than getting impatient and doing it by eye. I used blind hem stitch to do the hems because it seemed like the funnest way.
- Finishing seams is for suckers! Go and finish your beer instead.
- The next day, because of the superspeedy half arsed job you did, you are fresh as a daisy for toddler adventures! Win!


2 comments:
They're great. :-D As I still haven't done anything other than sew the leg seams on the trousers for Rose due to lack of baby-free time, I think trousers-in-an-evening are still a bit beyond me. But will save for future reference. :-D
The nonchalant stance completely covers any minor leg length inconsistencies, in fact didn't they say that James Dean had his jeans tailored different lengths so they matched when he slouched about the place?
Post a Comment